


This is a post that was part of Edie's Twelve Days of Handmade Christmas last year, but I thought it would be a great fit for this series!
These bean bags are a great gift for toddler...we play with ours all the time and have given them for birthday gifts to my little guy's friends.
These bean bags are a great gift for toddler...we play with ours all the time and have given them for birthday gifts to my little guy's friends.
On to the tutorial...

I love these “Toss and Learn: Colors” bean bags that I created a few months ago. They are the perfect present for any toddler in your life. Bean bags help with gross motor skills and sensory integration, and these help with color recognition…says the former teacher in me. :) We all love bean bags, right?
Of course, we are talking about bean bags here, so they’re pretty simple to make.
Here’s what you’ll need:
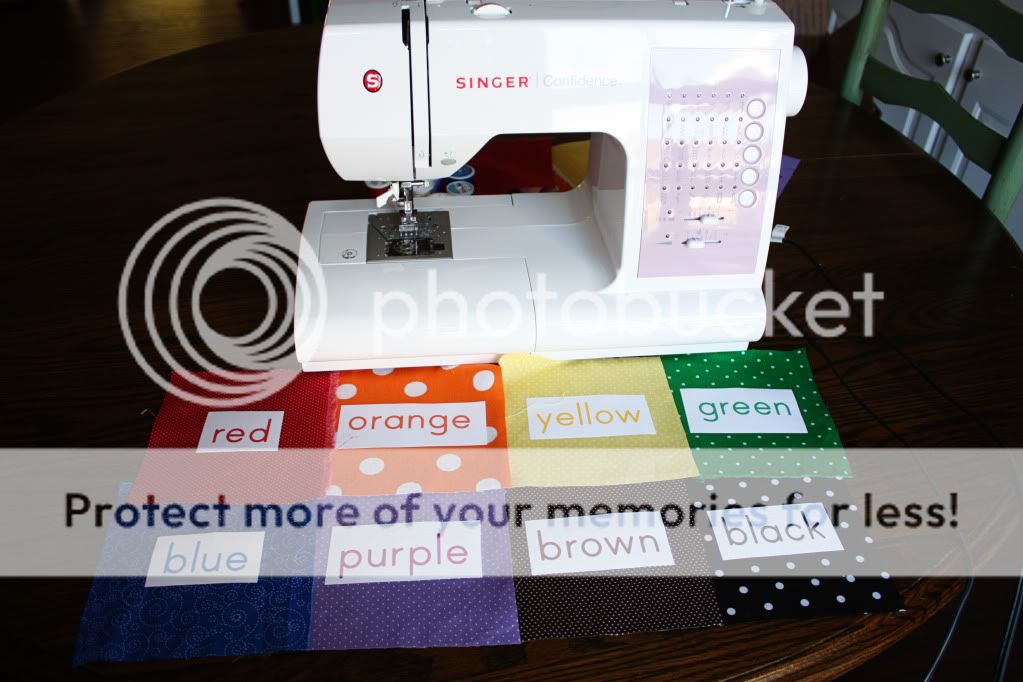
8 different fabrics (red, orange, yellow, green, blue, purple, brown, black).
You could add more or less depending on how many colors you want.
Coordinating or contrasting thread
Printable fabric – this adds an extra little bit, but I think it makes these bean bags what they are! This can be found at most fabric stores. I bought mine at Hobby Lobby with the 40% coupon!
Beans – this takes more beans that you’d think! (A funnel makes this job much easier!). I used pinto beans as they are sold in large bags at Wal-mart.

Step One:
Following the directions on your printable fabric, print the names of the colors on a single page. If you’re interested in a .pdf of this, e-mail me! The printable fabric that I used had to dry for a few minutes, so I recommend doing this step first. Cut your color names apart – be sure to size them so they’ll fit on your bean bags.
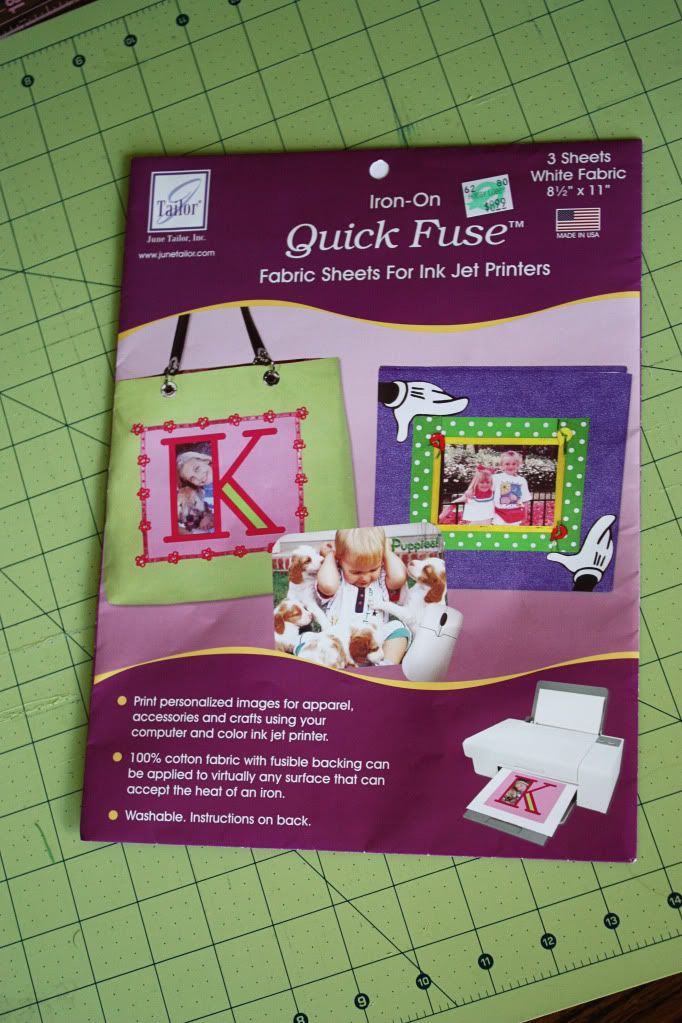
Following the directions on your printable fabric, print the names of the colors on a single page. If you’re interested in a .pdf of this, e-mail me! The printable fabric that I used had to dry for a few minutes, so I recommend doing this step first. Cut your color names apart – be sure to size them so they’ll fit on your bean bags.

Cut your fabric into 6-inch squares. If you have a cutting mat and rotary cutter, this step goes by quickly!
Step Three:
Lay out 1 side of each “bag”. Pin the color name to one side of each “bag”. Sew your color names on! You could use a fusible webbing to help secure it. The printable fabric that I bought already had the fusible webbing on the back, so it made it a little easier. Be sure to back-stitch to secure it!
Lay out 1 side of each “bag”. Pin the color name to one side of each “bag”. Sew your color names on! You could use a fusible webbing to help secure it. The printable fabric that I bought already had the fusible webbing on the back, so it made it a little easier. Be sure to back-stitch to secure it!


Step Four
After each color name has been sewed on, match up both sides of your bags and pin them together. Be sure that the RIGHT SIDES of the fabric are together, and sew with a ¼ seam allowance. Be sure to leave a 2-3 inch opening along one side of each bean bag – this is where we’ll put our beans in.

Step Five:
Clip the corners, turn the bean bags right-side out (be sure to poke the corners out), and iron flat.
Clip the corners, turn the bean bags right-side out (be sure to poke the corners out), and iron flat.
Step Six:
Fill the bags using whatever type of beans you have on hand. One cup seems to be a good amount to fill this size bag.
Fill the bags using whatever type of beans you have on hand. One cup seems to be a good amount to fill this size bag.

It helps if you have a trusty assistant!

Step Seven:
After you have filled the bags, pin the opening shut. Then either hand-sew or machine-stitch the opening closed. I like to machine-stitch it, and then top-stitch around the entire bag for added strength…we do have a 2-year old boy in the house! If you top-stitch around your bags, you’ll have to move the beans out of your way as you sew. This takes a little practice to move them to one side or the other, but you’ll get the hang of it!
After you have filled the bags, pin the opening shut. Then either hand-sew or machine-stitch the opening closed. I like to machine-stitch it, and then top-stitch around the entire bag for added strength…we do have a 2-year old boy in the house! If you top-stitch around your bags, you’ll have to move the beans out of your way as you sew. This takes a little practice to move them to one side or the other, but you’ll get the hang of it!

Step Eight:
You're done! Enjoy your Toss and Learn: Colors bean bags!
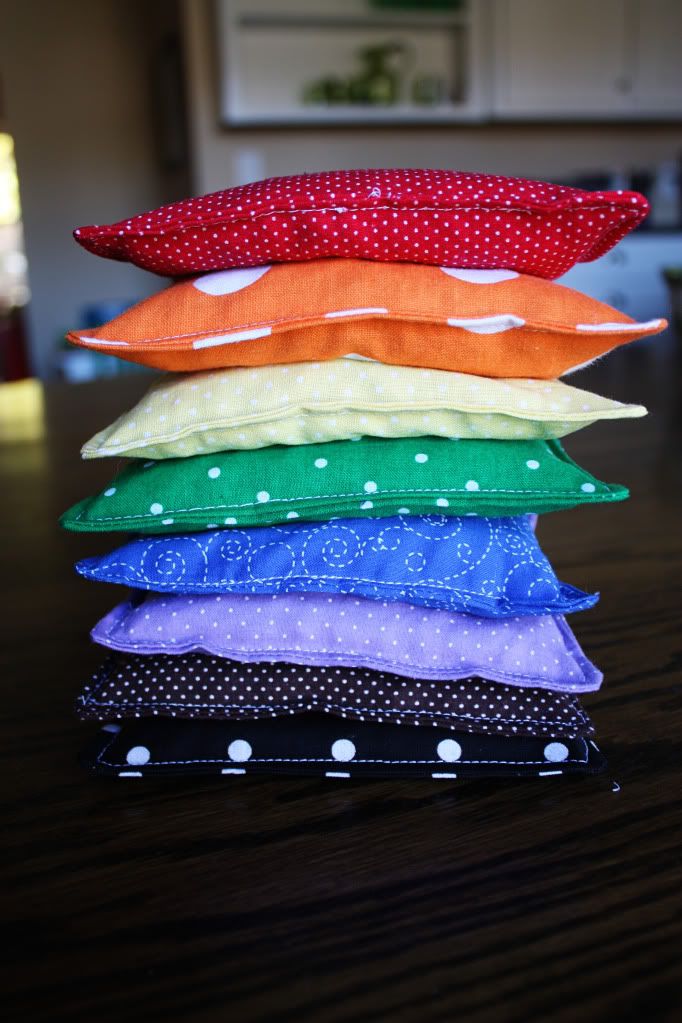
You're done! Enjoy your Toss and Learn: Colors bean bags!

Step Nine:
Make your cute little toddler’s day by “letting” him practice his colors while playing with the bean bags!

You can take this concept of "Toss and Learn" and use it to teach all kinds of skills...letters, shapes, numbers, etc. Start a little bean bag-making factory in your sewing room this weekend!

I LOVE these! Elliotte would absolutely have a ball being able to toss bean bags around and not get in trouble for it! So cute, MJ!
ReplyDelete