


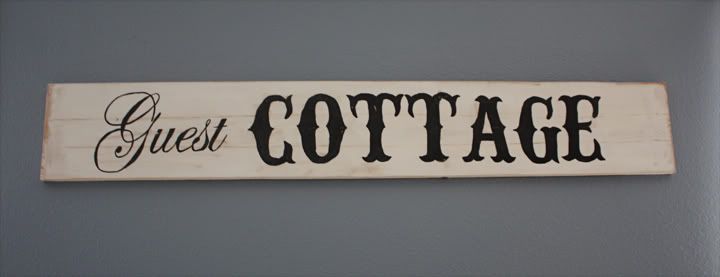
I was browsing on the Pottery Barn website and saw this sign and loved everything about it. I loved that it was worn, distressed, and vintage-looking...but didn't love the price. It's listed as "no longer available" on the website now, but I think it was well over $100. I will just enjoy looking at their inspiring pieces for free and create my own!

The nice thing about this sign looking worn and distressed is that it doesn't have to be perfect! That is definitely another plus in my book.

I'm going to take you through the project step by step...or at least the steps that I used. I'm sure you could do things differently, but here's what I did to make my version.
First, gather your supplies:
- a board cut to whatever size you'd like your finished sign to be.I went to Lowe's and bought a 1x8x4. I wanted something substantial, but not heavy since I'll be hanging this over the guest bed in our home. I was in luck because the wood that I wanted ended up being the cheapest of this type! It was a little less than $4.
- a variety of paint brushes (I used a sponge brush to paint the board and small artist's brushes to paint the lettering, but use whatever you have on hand)
- paint of choice (I used several different "white" acrylic paints, as well as brown and black)
- sand paper or a sanding block
- stain or watered down brown paint
- a copy of the phrase you'd like on your sign


I painted the board white, with a little tan and brown paint mixed in...just so it wasn't stark white. I didn't worry about sanding the board before I painted, because I knew I'd be sanding it later. If your board is splintered along the edges, you might want to hit it with a piece of sandpaper before you start to avoid splinters!

While that paint was drying, I opened up my trusty Photoshop Elements and did my best to recreate the fonts and look of the Pottery Barn sign. I made a canvas that was the same size as my board and sized the phrase to fit. (I ended up using Edwardian Script for "guest" and IFC Railroad for "cottage".) I printed this out actual size, which ended up printing on 4 sheets of paper. It required a little trimming before I taped it together, but it was an easy step!

Once base coat dried, I painted some lines down the length of the board. I liked that look in the Pottery Barn sign, so I did my best to mimic that. I basically painted a straight line with brown paint, but wiped off most of what I painted....just leaving a faint line in the background.

I laid my printed phrase out on top of the board, lining it up exactly where I wanted to, and just traced over the phrase with a ball point pen using a good amount of pressure. Because the board I used is soft pine, the pressure of the pen makes a faint outline of your letters.


Now it's time to paint your letters! I found it best to use very small brushes and really taking my time during this step. I don't have the most steady hand, so I took it slow. It only took me about 25-30 minutes to trace and paint all of my letters. Remember, we're looking for a vintage look so don't worry about it being perfect!
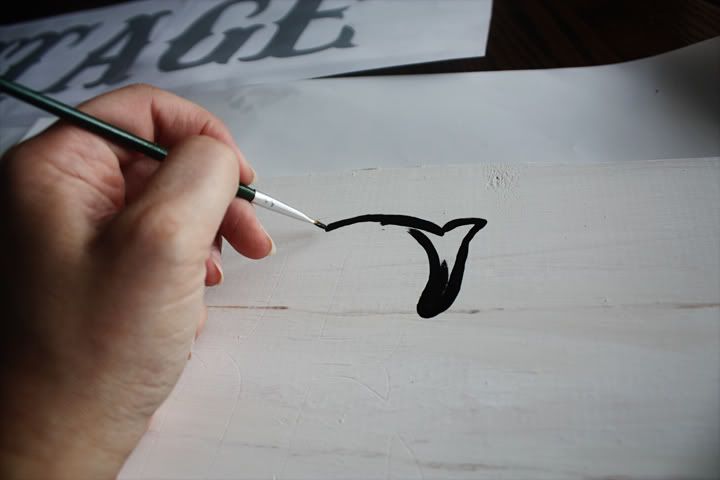

Some of you might be wondering why I started painting from right to left...I'm left-handed and always end up smearing my work if I paint from left to right. :)
Now it's time to give it more of that worn look! I let my sign dry overnight and then sanded down the edges with my sanding block. I also sanded the words down a bit in some places.
I used some stain that I had leftover from my Ruler Growth Chart project to add a little more dimension to the sign. I wiped it on and then wiped it off very quickly. You could easily use some watered down brown paint if you don't have any stain at home!
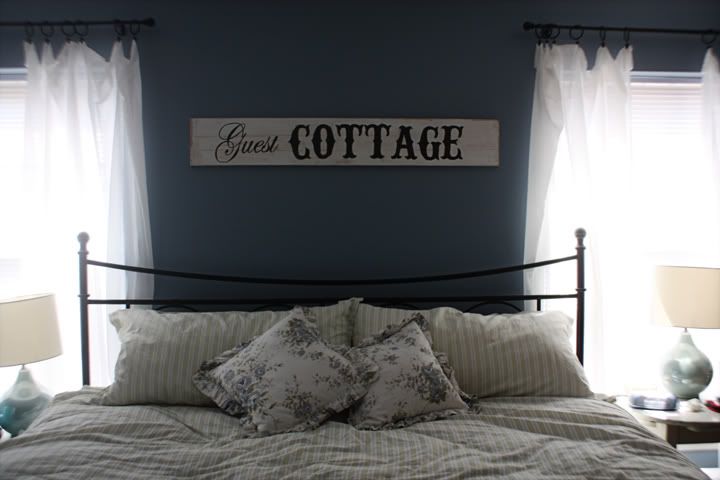
The only step left is to add some sawtooth hangers to the back of your sign and find a great spot for it!

If you have any questions, ask away! I'd love to help! :)
Thanks again to the ladies of Lemon Tree Creations for letting me guest post!
I love this! So cute!
ReplyDeleteIt came out great! What a fantastic job!
ReplyDeleteHave you seen my letter transferring method? You would need to use colored chalk though on a white surface.
http://blog.capscreations.com/2010/06/crate-address-planter-do-it-yourself.html
I love your sign! I, too, am left handed and have the same problem. LOL Thank you for sharing your demo.
ReplyDeleteCindie R
This is too cute!!!
ReplyDeleteLooks so great and is perfect timing - I was wanting to make one of these!
ReplyDeleteWhat were the fonts that you used. I cant seem to find them anywhere!
ReplyDeleteThank you so much! I have alot of scrap wood leftover from a much bigger project. This is the perfect solution to using those scraps for something good!
ReplyDeleteLove your signs! Little trick of the trade...paint black on your sign first then the white so when you sand your sign you will see black and then the wood. Gives an aged look w/out adding much work but gives the depth of layers to make it vintage. amy
ReplyDeletethank you for this tutorial. i don't have a guest room so i'm thinking about a "laundry" sign.
ReplyDeleteWhat a good idea to paint the lines to mimic multiple pieces of wood! I'm going to pin this so that I can reference your tutorial later when I get to creating something similar! Thank you!
ReplyDeletePerfect for the guest room I'm designing! Thanks for the great post.
ReplyDeleteLove this tutorial! I have some extra boards laying around from old pallets I would love to give this project a try. So glad I found you on pinterest!!!
ReplyDeleteWHAT A GREAT STEP BY STEP! THANK YOU FOR DOING THAT. I LOVE WHEN I CAN WALK THRU IT AND YOU DID A WONDERFUL JOB! IM FOLLOWING YOU ON PINTEREST!!!! THANK YOU AGAIN!!! :0)
ReplyDeleteThank you for this tutuorial! It is so much easier than creating a custom stencil. I just posted my results if you want to check it out: http://mycreativeresolution.com/2014/09/13/hand-painted-sign-completed/
ReplyDeleteYay for the lefties! Lol. This is a super idea. I'm going to use the left over borders to design a door sign, and one of these. Thanks much for sharing!
ReplyDeleteThankyou!! I have been toying with the idea of doing this, but wasn't sure I wanted to tackle such a big project. Now I know, it's do-able. Thanks again
ReplyDeletegreat tutorial <3
ReplyDelete