Friday, September 30, 2011

31 days of…warming up to the holidays

There are 86 days until Christmas.  I know, I counted for myself.  That includes today and Christmas, so you may be looking at only 83 days, depending on how you count.  We all know that those 86ish days are going to go by so fast. 

Last year one of my favorite bloggers, Nester, and some of her fabulous friends devoted 31 days of writing about various topics…they’re doing it again this year and they’re opening it up to all of blogland!  I thought this would be a challenge for me, both to write every day for a month (!) and to get myself ready for Christmas.  So I’m spending the next 31 days writing about warming up to the holidays…ways to prepare your home and your heart for the season.  It’ll be a mix of decorating ideas, crafty gift ideas, and “devotional” ideas for the season.  You can bet there will be some randomness (is that even a word?!) thrown in there for good measure, too.
31 days_button

I hope you’ll join me for the next month as we warm up to the holidays!

If you want to check out what the fabulous bloggers are writing about this year, check them out here:

Jen - 31 Days to Balancing Both Beauty and a Budget
Jessica – 31 Days of Memory Keeping
Melissa: – 31 Days: Inspired Holidays
Sandy – 31 Days of Warm Connections
Darcy: 31 Days of Photo Tips
Emily: 31 Days to Change the World
Emily: 31 Days of the Little Things
Nester – 31 Days of Charming Imperfection

Thursday, September 29, 2011

DIY ragamuffin garland

Are you one of those people that puts all of your decorations out at the beginning of the season and leaves them out until it’s time for the next season?  Or do you constantly rearrange and add to your décor?  Or do you still have your 4th of July wreath on the front door and leave it up until Christmas?

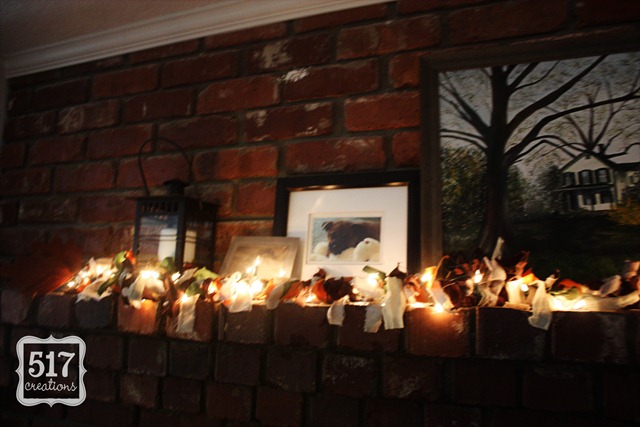
I definitely am part of the group who adds and rearranges décor until the next season rolls around…and usually starts decorating before the “season” actually starts.  Every year I add something different to my seasonal décor.  This season’s “new thing” was totally copied from Cassity’s (from Remodelaholic fame) awesome lighted ragamuffin garland.  I pinned it a while ago and came across it again this morning…so I made my own using what I had on hand.

garland2

Cassity has a great tutorial on her blog, so make sure to check it out if you want to make your own!  I ended up using a large piece of fabric to make my “roll” (Cassity used towels) because I had been gifted with a bag of fabric from a friend.  One piece was several yards long and ended up being great for this project.  I just cut it to the length I wanted to use, rolled it up, and taped it up like Cassity shows.

Here are a few more “close ups”…

garland5garland4

Wouldn’t it be cute using red and green fabric for Christmas?  I could see this in a kiddos room as seasonal décor that also functioned as a night light.  I know my little guy would love it!

Are you finished with all of your fall decorating?  Haven’t started yet because you’re still sweltering in 100 degree heat?  Or just waiting until you can decorate for Christmas?

Wednesday, September 28, 2011

updates to the shop…

Thanks to my wonderful husband and his amazing “daddy skills”, I spent a few hours sewing this weekend! There are some new products in the shop to show for all of that sewing!

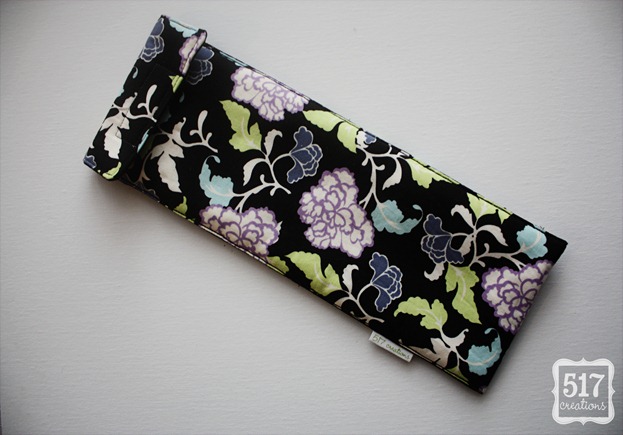
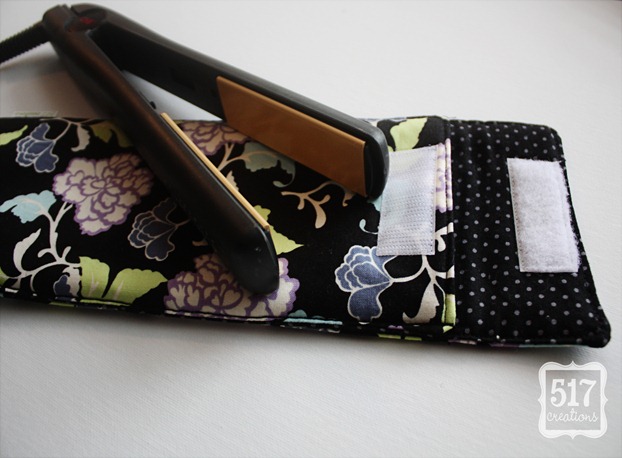
The first product, a Hair Straightener Cover.

straightener_cover1

straightener_cover3

We recently had a friend travel and her luggage got caught in a conveyor belt or two, crushing her Chi flat iron!  After hearing that story, I made myself a padded flat iron cover before we travel in a few months…and thought I’d add them to the shop in case any of you want to protect your straighteners while you travel. 

The cover is made with 100% cotton fabric and padded with Insul-bright to protect the fabric from a warm flat iron. The cover closes with a hook and loop closure.

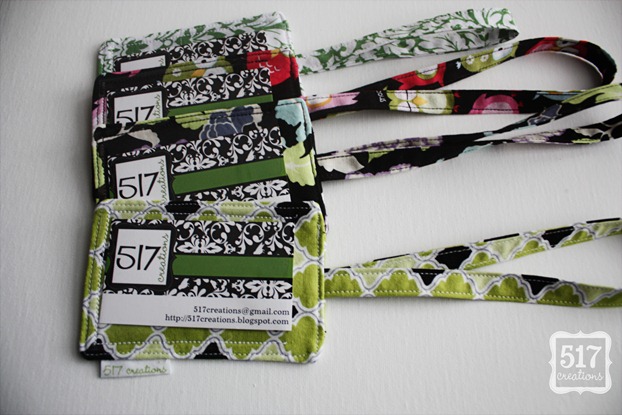
Travel must be on my mind right now because the second product I added were these cute Design Your Own Fabric Bag Tags!

luggage tags1ed

These bag tags are great for helping you spot your luggage in the sea of black suitcases.  They are also perfect for diaper bags, back packs, and computer bags!  I have one on my camera bag and sewed a baseball one for the backpack that Grayson takes to preschool.

Check out the shop for these new additions!

Tuesday, September 27, 2011

chocolate + peanut butter = perfection


I'm definitely not a food stylist, but I had to include a picture to go along with the best.recipe.ever for peanut butter frosting!  Seriously, if you love peanut butter and chocolate together - and really, who doesn't? - you need to whip up a batch of chocolate cupcakes and top them with this fabulously easy and amazing tasting recipe.

I have been searching for a great peanut butter frosting for a while and have finally found the perfect one from the Barefoot Contessa. And wouldn't you know it, it is SO easy...especially if you have a Kitchen Aid mixer.  I actually had all of these ingredients on hand, too.

Okay enough chatting, here's the recipe...

Peanut Butter Frosting

**This makes enough to frost about 14 cupcakes.

Prep Time: 10 minutes

1 cup confectioners’ sugar
1 cup creamy peanut butter
5 tablespoons unsalted butter, at room temperature - BE SURE that the butter is at room temperature!
¾ teaspoon vanilla extract
¼ teaspoon kosher salt
1/3 cup heavy cream

Place the confectioners’ sugar, peanut butter, butter, vanilla and salt in the bowl of an electric mixer fitted with a paddle attachment. Mix on medium-low speed until creamy, scraping down the bowl with a rubber spatula as you work. Add the cream and beat on high speed until the mixture is light and smooth.
Pin It

Monday, September 26, 2011

laundry room command center...

Don't we all love those command centers (called "Daily Systems" by PB) that keep popping up in the Pottery Barn catalogs and all over blogland?  I have been staring at this blank wall in our laundry room for months now and finally figured out what to use it for...a command center!

I wanted a dry erase calendar as part of the command center but needed a BIG one.  I saw a coupon floating around the internet for a free 16x20 poster print at Wal-mart and thought that would be the perfect thing to use for my calendar.  Here's the calendar that I designed:


I printed out it out for FREE, bought a $11 frame (although these are easily found at garage sales - I just wanted my project done that night!) and popped the calendar in the frame.  Now I have dry erase calendar that works perfectly for our family.

If you'd like your own 16x20 calendar, leave me a comment and I'll e-mail you a digital copy!  You can print your own for free at Wal-mart - be sure to call your photo center first to make sure they accept the coupon!

I'll be sharing the rest of the "mini makeover" in our laundry room over the next few days!  If you'd like to see some of my inspiration, check out my Laundry Rooms board on Pinterest.

Saturday, September 24, 2011

link love: 09.24.2011

It's another great week of link love...most of these ideas that I've come across are fall-related.  I just can't help it, fall is my FAVORITE season.


                                                                                                     Source: lessthanperfectlifeofbliss.blogspot.com via Mary Jo on Pinterest 


I just love this Blessings Board. I made one as a giveaway for our MOPS group last year and am definitely planning on making one for our home this year. Wouldn't this be a great hostess gift to take to Thanksgiving dinner? If you start scouring the garage sales now, you can make this for a bargain!

                                                                                              Source: sassysanctuary.blogspot.com via Mary Jo on Pinterest


Photos of beautiful fall mantels are all over blogland...this is the perfect alternative for those who don't have mantels. I especially love the barn door shutters!

                                                                                                  Source: recapturedcharm.com via Mary Jo on Pinterest


This is definitely going on the "to do" list for me. I LOVE this idea! I just saw a grapevine pumpkin at Hobby Lobby that might work well for this project (using my 40% off coupon, of course)...

                                                                                                  Source: vermillionrules.blogspot.com via Mary Jo on Pinterest


I've seen all of those cute ruffled scarves in stores and Etsy shops...now I can make my own using a t-shirt! This would look really cute with a fabric flower (or three) pinned to it.

                                                                                                          Source: isewdoyou.blogspot.com via Mary Jo on Pinterest

If you are wondering what to do with your extra Martha Stewart glitter, you must try this fabulous Glitter French Tip tutorial by my crafty friend, Amanda from I Sew, Do You?  If you haven't checked out her blog, grab a cup of coffee and settle in...she has some great recipes and DIY projects!

What have you come across this week on the good ol' blogs or Pinterest?

Friday, September 23, 2011

A Barn Light Electric Giveaway


Barn Light is hosting an amazing giveaway.  They are giving away one $1,000 Grand Prize and one $500 Second Place Prize to 2 lucky bloggers.  These come in the form of gift certificates to get new lighting for their home.

Barn Light Electric is the place to buy a lot of those fabulous light fixtures that are popping up all over blogland.  I have lovingly gazed at light fixtures on their website before...especially when we were remodeling our home.  Here are some of my favorites:

I love this Warehouse Pendant.  I could see two of these hanging over our peninsula...


I would replace the light in our guest bathroom/Grayson's bathroom with this amazing Austin Sconce.


Wouldn't this Coast Guard CGU sconce be fabulous in a boy's room or playroom?   Love it.

Are you drooling yet?  Have you created your own Wishlist on Barn Light Electric?  Here are the details and how you can enter to win:
The prizes include:

1st place - one $1000 grand prize gift certificate and the second place prize is one $500 gift certificate.  That should help finish up a project or two.


Here’s how you can enter giveaway:
  • Feature your lighting picks on your personal blog, and link to the lights if you can!
  • Copy/Paste these rules at the bottom of your blog post.
  • Once your personal article is up, you must email your blog link to: contest@barnlightelectric.com to be qualified to win. The contest ends October 12th, 2011.
  •   Don’t have a blog? Find out how you can enter by visiting their website.

Wednesday, September 21, 2011

a new favorite store...

Since moving to SW Missouri, I've heard about this store in Springfield and has incredible deals on fabric. I put FM Stores on my "places to visit" list and didn't think much about it...

That is until my husband suggested we take a quick trip to Springfield (it's about an hour) last Friday to grab a book that he wanted.  I know you're re-reading that sentence, aren't you?  We definitely have book stores here in town, but we have to drive to Springfield or Rogers, AR to shop at Mardel or Lifeway.   Anyway, back to the good part...the fabric.

I mentioned the store to Scott and he offered to drop me off at the fabric store so I could browse.  Here is what I saw when I walked in...


Premier Prints fabric in the oh.so.popular yellow and gray colorways....there is that gray chevron that's popping up all over the blogs.


More Premier Prints in navy and white.  Don't you love those stars?


And even more Premier Prints...they had every colorway offered of Premier Prints. Blues, greens, black/white, gray/purple, etc.  It was fabulous.

I texted my husband the minute I picked my chin up off of the ground and said "I've died and gone to fabric heaven...seriously."  Not only was there an incredible amount of fabric but the prices were RIDICULOUS!  54" wide fabric for WAY less than you can find it online.  I couldn't believe it.

This was just one room of the store.  The rest of the store was packed FULL of tons of 100% cotton solids (for $3.99 a yard!), chenilles, miles and miles of trims, zippers for $0.25, and lots, lots more.
There are some crazy things in the store (weird fake flowers and "grandma" clothes for sale) but it adds to the eccentricity of the store.

If you're ever near Springfield, Missouri, be sure to schedule a stop at FM Fabrics.  If anyone needs any great Premier Prints fabric at a steal of a deal, let me know!

Do you have any great "hole in the wall" fabric stores in your town?

Tuesday, September 20, 2011

curtains for the boy's room...


On a whim, we recently moved our little guy's toddler bed out of his room and the queen-sized bed from our guest room in.  Grayson suddenly had a "big boy room" that needed to be a little more pulled together.  Thank goodness for Pinterest!!

I have an entire board on Pinterest devoted to ideas for my little boy's room.   I wanted his room to be red, white, and blue and have some baseball elements, but with a vintage, pulled-together-over-time look.  Got all that?  Ha! :)

 I bought a navy blue quilt and shams set at Target, had a friend come over and help rearrange the furniture and "art" on the walls, and called it a day.  One of the things that was on the "to do" list was to make some curtains.  Curtains seem to make a room look instantly pulled together and can usually be done inexpensively!   These are the curtains that I kept coming back to and planned to make some similar to this but with red stripes...

                                                                          Source: girlintheredshoes.com via Mary Jo on Pinterest


Fast forward a few weeks and our sweet boy decided that his napping days were over and he began waking up at 6:30am instead of his usual 7-7:30am.  My husband said "Do you think curtains would help?"  The question wasn't even out of his mouth before I started planning the curtains.

I nixed the off-white with red stripes idea in favor of red curtains with white stripes...here's what I came up with:


I came across some twin-sized red flat sheets at Wal-mart for $5 and thought they would be perfect.   I bought 2 red flat sheets (I cut one sheet in half to make 2 panels, so one sheet for each window) and 1 white sheet (for the stripes). If I weren't so cheap needed wider curtains I would have bought the full-sized flat sheets for $10.

I apologize for not taking pictures of the steps...I was too nervous about how they would turn out.  So, I'm going to do my best to explain the steps.  If you have any questions, send me an email!  I'd be happy to answer them!  If you're not interested in the "how to", feel free to skip down to the bottom of the post to check out the rest of the pictures!

While the sheets were in the washing machine/dryer, I tried to plan out the size of my stripes.  The sizes I ended up using were 6 inches at the top, 3 inches in the middle, and 2 inches at the bottom.  The white sheet was a little too thin for my liking, so I decided to use a double thickness for each stripe.  So for each stripe, I double the measurement and added 1/2 inch (for a seam allowance).  For the top stripe, I cut a piece of sheet that was 13 1/2 inches x the width of the sheet.  I simply ironed that piece in half horizontally, sewed raw edges together, and then turned it inside out...basically creating a giant tube.  I ironed it well (the iron is totally your best friend on this project) and then ironed a strip of Heat N' Bond to the top of the stripe.  This helped a TON when it came to attaching the stripes.  It held the stripes in place until I could secure them with my sewing machine.

Once all of the stripes were ironed, I decided on the placement of the stripes.  My stripes start 6 inches from the top and have 1 inch in between stripes.  I peeled the paper off the back of the Heat N' Bond and ironed it in place...being very careful to keep the stripes straight.  I used my acrylic ruler as I was ironing to keep everything lined up.

I ironed the top stripe on, the sewed it down on both the top and bottom of the stripe.  Follow the same steps for the second and third stripe.  Here's a closer view of the stripes:


Now that all of my stripes were sewed, I cut the curtain in half to make 2 panels.  It was SO much easier for me to cut them in half after the stripes were lined up...then I knew for sure that both of my panels would "match" when the curtains were pulled shut.  

If you have thick enough sheets, you could hem up the edges and be done!  I decided to line these curtains to help give them more stability and hopefully give us another hour of sleep by blocking that pesky light!  I followed the awesome tutorial by Miss Mustard Seed found here.

Grayson's curtains are hung by ring clips because he's a 3 1/2 year old boy.  I had visions of him playing Spiderman and climbing the curtains...so ring clips it was.

This project took about 2 1/2 hours total and cost about  $35 (including the sheets and curtain rods...I already had the curtain lining and ring clips on hand).  Totally worth another hour of sleep in the morning and a few nap times a week!


In the interest of full disclosure, I had planned on hemming the curtains after they were hung and I had a chance to see how much they needed to be taken up.  They have been hanging up for a week and a half and that hasn't happened.  Seeing as 3 curtains are hiding behind furniture, I doubt it will happen anytime soon! :)

This was the first set of lined curtains I have made...if I can do it, you can do it!

If you Like it...

Monday, September 19, 2011

a little fall secret...


I'm going to let you all in on a little secret...if you want to buy one of the best (and cheapest) fall candles, run out to Wal-mart and buy this Mulled Cider candle!  This size has 3 wicks and will set you back a whopping $3.25, but will make your entire house smell like fall.  I know that "cheap" candles usually don't put out enough scent but this one smells delicious. 

And no, Mr. Walton is not paying me to suggest this...but if Wal-mart wants to pay me, pay me in Mulled Cider candles!   These sell out fast and if they don't sell out, they often pull them in the next few weeks to put out their Christmas scents, so you'll want to buy some today.  I burned the Mulled Cider candle from September through February last year and loved every minute of it.

What is your favorite fall-scented candle? 

Saturday, September 17, 2011

link love: 09.17.2011

It is definitely feeling like fall this week, so I thought I'd have another little themed link love this week...wreaths! There are some seriously fabulous fall wreaths floating around the internet.  Here are a few of my favorites....


                                                                       Source: jonesdesigncompany.com via Mary Jo on Pinterest


If I could pick a fall wreath to hang on my door every.single.year it would be this one from Emily Jones (of Jones Design Company). Would you believe that this wreath is made from coffee filters?  Pretty incredible.  When you get to the end of this post, you must hop over to Emily's blog (just click on the pin above which will bring you to Pinterest...click again to be taken to the tutorial), grab a cup of coffee, and settle in.


                                                                     Source: etsy.com via Catherine on Pinterest


This is not a tutorial, rather a link to an Etsy shop...but I LOVE everything about this yarn wreath.


                                                                            Source: impartinggrace.com via Mary Jo on Pinterest


Richella, from Imparting Grace, spotted a similar wreath in a William Sonoma catalog and used that inspiration to make this wreath for FREE!


                                                                        Source: jonesdesigncompany.com via Rachel on Pinterest


Another Emily Jones original. So simple...burlap, a few flowers, a feather, and a tag.  Simple but totally fabulous.


                                                       Source: sheskindacrafty.blogspot.com via Mary Jo on Pinterest


If you're more into football than decorating for fall, you might want to try your hand at making one of these ribbon wreaths to show everyone on the block who you cheer for!


If you want to check out lots of great wreaths, visit the Nester's "You Made a Wreath Out of What?" linky party!

Do you have a wreath on your front door?  Are you more of the DIY'er or the "drive to Hobby Lobby and buy what I like"-er? 

Thursday, September 15, 2011

{guest blogger}: bedford project table knockoff

I'm so excited to have Beth, from Nashville Pug, guest blogging today!  Beth is totally a blogger after my own heart...she has a fantastic Pottery Barn knock off to share today! 

Hello fabulous 517 Creations readers! I'm Beth from NashvillePug, and I am oh so honored to be guest posting for y'all today! When I'm not educating the future nurses of America or chasing around my two year old daughter, you can find me doing home projects or rearranging my house! MJ made my day when she asked to feature my Pottery Barn Project Table knockoff. It's my favorite project I've completed because it gave me a HUGE craft/sewing/project space, and I saved $1000 by making it myself! Read on for the full tutorial and please stop by and visit me at NashvillePug! I would love to have you!

Pottery Barn is going to hate me...
This is the desk I wanted for my craft/work/laundry room. "The Bedford Project Table" It's from Pottery Barn, and it costs $1,099 (plus $120 shipping). Nope, not in the budget. Not even close.


It took me a quick second to realize that I had seen those cubes before in the form of the below Closetmaid Cubeicals, found at Target for $40, on sale. I could use two of those for either end, and then all it needed was a tabletop, and I would have my craft table! So, I sent Ben to Home Depot for some wood. (If you know me and my projects, sending Ben to get some of my supplies is HUGE!) I decided I wanted the table to match the PB specifications of 55 inches long x 37 inches high x 38 inches deep. The cubes are 36 inches high and 36 inches deep. He came home with 7, 2x6 boards that they cut at Home Depot to 55 inches long. The boards are actually 5.5 inches wide, but for some reason they are called 2x6. Probably to confuse people like me who would have trusted that they were 6 inches wide like it said and not bothered to actually measure.


I knew I wanted to stain the wood instead of painting it white like the PB version. I wanted the top to contrast with the white cubes. So, I picked up a can of wood conditioner and a can of stain & poly in one ($24 total). The stain color is "Mission Oak Satin". The stain plus poly is different from regular stain in that you don't wipe it off in between coats. You brush on a thin coat, let it sit for 6 hours and then apply another coat if needed. I only needed one coat, and it looked great!


Don't let the smile fool you; he HATES projects!


My staining setup in the garage. Who needs a saw horse when you have loads of paint cans?


This is my craft area before:


The desk is long, but not tall or wide enough to do my sewing projects easily. I envisioned something that would let me stand to cut fabric with lots of storage.

And after!!! I am in love with my new table! To assemble, we screwed the boards to the cubes from underneath the top shelf of the cube. That way, when we move, we can just unscrew and go. I think we're going to add some braces in between the boards underneath as well to give it more stability.


Look at that wood!


Can't wait to start using this guy at my new table!


I think it looks quite similar to the PB version! I love having all the cubes to store my craft & sewing supplies, stationery, etc. The PB version has a back on the inner sides of the cubes, but I think I'm going to leave mine open since I can grab things from either side. Now I just need to make a trip to the consignment store, also known as my parents' basement, and grab a bar stool!


Project break down:
White cubes from Target: $80
Wood from Home Depot: $20
Conditioner & Stain: $24
Project Total: $124
PB Project Table: $1,099 + $120 shipping
Savings: over $1,000!!
I made this table for the price of shipping!

What have you knocked off lately?
Isn't that awesome?!  I am trying to figure out how I can re-arrange the guest room/sewing room to include one of these fabulous work spaces.  Be sure to hop over to Beth's cute blog, Nashville Pug! 

Tuesday, September 13, 2011

curtain help anyone?

I asked for your help with the large window in our dining area a few month ago.  I finally decided to add thick plantation-style blinds in the window, to give a little consistency as we have those in all of the windows in the front and sides of our house.

I love the blinds because they're functional (we're not blinded by the sun as we eat breakfast anymore) and they have really clean lines.  I'd still like to add some curtains to frame out the window a bit more.  Here's where you come in....

Being completely in love with the striped curtain trend, I'd love to make some for that window.  Here are a few pairs of curtains that I love:


                                                                          Source: decorate.tipjunkie.com via Nicole on Pinterest


                                                                    Source: iheartorganizing.blogspot.com via Mary Jo on Pinterest


                                                                                Source: thenester.com via Mary Jo on Pinterest

My only question is what colors should I use??

Here is a little moodboard of the other large elements in our living and dining rooms.


Our living room and dining area is basically one huge open room with distinct areas.  I obviously like neutrals so I can use pops of color in pictures and accessories.  I'm really leaning towards the white and dark tan curtains like the fabulous Nester.   Of course these will be DIY and on the cheap...probably using sheets!

What do you think?  Would you stick with the neutrals or go for a bold color? Are you on board the striped curtain bandwagon or are they too trendy for your taste?  


Monday, September 12, 2011

{pottery barn inspiration}: make your own guest cottage sign

This was posted over at Lemon Tree Creations last week, but I thought I'd post it here for anyone who hasn't seen it...

I was browsing on the Pottery Barn website and saw this sign and loved everything about it.   I loved that it was worn, distressed, and vintage-looking...but didn't love the price.  It's listed as "no longer available" on the website now, but I think it was well over $100.  I will just enjoy looking at their inspiring pieces for free and create my own!


The nice thing about this sign looking worn and distressed is that it doesn't have to be perfect!  That is definitely another plus in my book.


I'm going to take you through the project step by step...or at least the steps that I used.  I'm sure you could do things differently, but here's what I did to make my version.


First, gather your supplies:

  • a board cut to whatever size you'd like your finished sign to be.I went to Lowe's and bought a 1x8x4.  I wanted something substantial, but not heavy since I'll be hanging this over the guest bed in our home.  I was in luck because the wood that I wanted ended up being the cheapest of this type!  It was a little less than $4. 
  •  a variety of paint brushes (I used a sponge brush to paint the board and small artist's brushes to paint the lettering, but use whatever you have on hand)
  • paint of choice (I used several different "white" acrylic paints, as well as brown and black)
  • sand paper or a sanding block
  • stain or watered down brown paint
  •  a copy of the phrase you'd like on your sign


I painted the board white, with a little tan and brown paint mixed in...just so it wasn't stark white.  I didn't worry about sanding the board before I painted, because I knew I'd be sanding it later.  If your board is splintered along the edges, you might want to hit it with a piece of sandpaper before you start to avoid splinters!


While that paint was drying, I opened up my trusty Photoshop Elements and did my best to recreate the fonts and look of the Pottery Barn sign.  I made a canvas that was the same size as my board and sized the phrase to fit.  (I ended up using Edwardian Script for "guest" and IFC Railroad for "cottage".)  I printed this out actual size, which ended up printing on 4 sheets of paper.  It required a little trimming before I taped it together, but it was an easy step!


Once base coat dried, I painted some lines down the length of the board.  I liked that look in the Pottery Barn sign, so I did my best to mimic that.  I basically painted a straight line with brown paint, but wiped off most of what I painted....just leaving a faint line in the background.


I laid my printed phrase out on top of the board, lining it up exactly where I wanted to, and just traced over the phrase with a ball point pen using a good amount of pressure.  Because the board I used is soft pine, the pressure of the pen makes a faint outline of your letters.


Now it's time to paint your letters!  I found it best to use very small brushes and really taking my time during this step.  I don't have the most steady hand, so I took it slow.  It only took me about 25-30 minutes to trace and paint all of my letters.  Remember, we're looking for a vintage look so don't worry about it being perfect!


Some of you might be wondering why I started painting from right to left...I'm left-handed and always end up smearing my work if I paint from left to right.  :)


Now it's time to give it more of that worn look!  I let my sign dry overnight and then sanded down the edges with my sanding block.  I also sanded the words down a bit in some places.


I used some stain that I had leftover from my Ruler Growth Chart project to add a little more dimension to the sign.   I wiped it on and then wiped it off very quickly. You could easily use some watered down brown paint if you don't have any stain at home!


 The only step left is to add some sawtooth hangers to the back of your sign and find a great spot for it!


If you have any questions, ask away!  I'd love to help! :)

Thanks again to the ladies of Lemon Tree Creations for letting me guest post! 
Related Posts Plugin for WordPress, Blogger...